Don’t be scared of your pods: Kubernetes troubleshooting fundamentals

Are you ready to take your cloud dev skills to the next level? Troubleshooting production workloads in Kubernetes (k8s) is a core skill that can amplify your value as a developer and make your team more self-reliant. While Kubernetes is a state-of-the-art technology, developers are reluctant to log onto a production cluster workload to analyse it. Do not be intimidated by pods and containers anymore. In this hands-on article, I will equip you with the fundamentals terms, and we will log into your container for the first time! In future articles, we will dive deeper.
Accessing a single container for inspection is totally fine. Unless you are running a single instance of a business critical app. It is expected that containers crash occasionally and another instance takes over the work until the instance recovered. But you need to understand what you are doing, how it can impact the production workload, and assess the potential risk associated with it. The latter is important when communicating the next steps to a project manager or product owner. So let’s first get a brief overview of how a deployed workload looks like.
Example workload
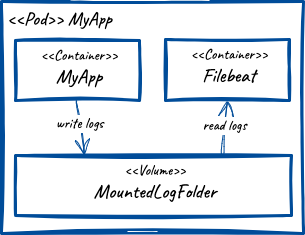
The above illustration represents the smallest deployable resource in k8s, a pod. The deployed application runs in a container alongside another container. In this example, filebeat is reading the logs from a shared folder and publishes them to a central repository for analysis. What is essential to note is that the two containers are sharing resources within the pod. This significant pattern is called the sidecar pattern.
Getting permissions
The goal here is to log onto the container in which our application is running. We will use kubectl to access the application. Firstly, make sure that a) your ops team has provided you with permissions to the cluster’s relevant resource and b) clusters are configured on your machine, so you can use them via kubectl. I am sure you find a nice person in the ops team that spends a few minutes setting it up with you together. You can read up more about authentication in the official docs of k8s. Note that while learning k8s, I recommend not to use tools like Lens but the CLI in the beginning. This will give you a more solid and universal understanding. First, install kubectl.
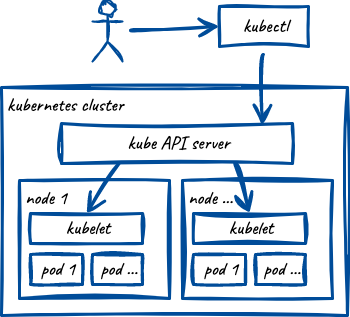
Now, to access your container, you need to locate its pod first. Do that with the kubectl get pods command. A common pitfall is that the pod is located in a separate namespace. The default one is called default. To choose another one, type kubectl get pods --namespace custom_one. The command returns a list of all pods with their current state. This can be the first level of troubleshooting. If your application is crashing or not starting correctly, you will be able to see this here. In the following picture, you see how your CLI communicates with k8s.
Know the risks
Before we start interacting with the container, let us go back to the risk assessment. When logging onto a container, one can: delay responses, interrupt the process execution, leak credentials/keys, break the network communication. You can do a bit more, but this is enough for now. To avoid the above, it is a good idea to follow these best practices to avoid
- Leaking of information: Do not use credentials or API keys from the container anywhere.
- Interrupting the process or delaying responses: Do not run expensive processes or download large files to the container. This will take computing power away from the app and might exceed the pod’s resource limits.
- Breaking the network configuration: Do not alter any configuration files, neither from the system (e.g., hosts file) nor from the app configuration. Unless you know exactly what you are doing.
These are my top three. In addition, to minimise the risks, it is always a good idea to test your commands in a non-production environment. Think about the above scenarios before you interact with your container.
Log onto your container
Now, let’s get our hands dirty. We have our pod name (my_app in this example). To log onto our container, though, we also need the container name. Use kubectl describe pod <pod name> where <pod name> hold the name of your pod. This will print the pod description with a list of the containers. There you will find your container’s name. We can now use the following command to log onto the container: kubectl exec -it my_app --container my_container -- sh. Note: When there is only one container, you do not need to specify the container name.
This command will enter the container and start a sh (shell) process. From here on, you can operate like in a typical UNIX environment. Although you need to always consider that you are working on a different operating system (as stated in your Dockerfile.) This can affect the available commands. I suggest that from here you go and explore the system.
Use the exit command to end your shell session.